Home Page (on the Web) - News and Updates
Part One - Introduction and Tutorial
Part Two - Techniques and Examples
Part Three - The Invocation API
![]()
Overview What's the Invocation API? Configuration Setting the proper path for the Invocation API. Example Yet another Hello World! example. A Closer Look The Hello World! example in detail. Alternate JRE Version The Hello World! example using the JRE in the JDK 1.1.5. Dynamic Loading Choosing the JRE and version at runtime. A GUI Example This example shows a Delphi GUI application that uses a Java class to download web pages to your computer.
- The Java Code - A Java class called PageGrabber implements the functionality of downloading HTML pages.
- The Delphi Application - A Delphi program called URLGrabber implements the UI for application.
- Loading the VM - Demonstrates loading the Java VM and storing the Java environment in a member of the Delphi class.
- Class Method - Demonstrates calling a Java class (static) method from the application's main thread.
- Object Method - Demonstrates calling a Java object (non-static) method from the application's main thread.
- Threads - Demonstrates calling a Java method from a worker thread.
- Multiple Threads - Demonstrates calling a Java method from multiple threads.
Summary What's next?
This part of Using the Java Native Interface with Delphi is concerned with the Invocation API. This API is still part of the JNI, but it is uses it in a somewhat different manner. Another term you may come across when dealing with the Invocation API is the phrase embedding the Java virtual machine in an executable program or DLL. This makes the Invocation API sound daunting, but, rest assured, it's not as difficult as it may sound. Embedding in this context simply means loading the DLL that contains the runtime code for the Java Virtual Machine. You'll see that it is no different than loading any other DLL on your system.Up to this point, our study of the Java Native Interface has focused primarily on accessing Delphi (native) code from within Java code. There are many reasons why you would want to do this, and one of the biggest reasons for doing this is to gain reuse of the millions of lines of proven, tested, efficient, and debugged Delphi code. This is certainly much more productive than rewriting the Delphi code in Java. But what if you wanted to do it the other way around? What if you had millions of lines of proven, tested, and debugged Java code that you would like to use in your Delphi application? Again, it would be more productive to be able to reuse this code without having to rewrite it, this time, in Delphi. Well, that's one of the big features of the Invocation API.
To contrast the Invocation API with the portion of the JNI we have been learning up until now, let's consider how each is invoked. In all of the preceding tutorial and examples, the way the program was run was by typing:
at the command prompt. This caused the Java runtime (java.exe) to be executed. Since java.exe is an executable program like any other, it is merely loaded into memory by the OS and begins executing. One of the things that the program does is to locate and load the Java class Main.class. While loading this class, the Java runtime discovers that it also must load a DLL (in our tutorial from Part One, this is HelloWorldImpl.dll.) Recall this code from HelloWorld.javajava MainThis DLL is loaded and the interaction between the Delphi code and the Java code takes place as described in Part One and Part Two of these pages.System.loadLibrary("HelloWorldImpl");Note: The important point to understand in this scenario is that the Java runtime, java.exe, is what bootstrapped the whole process. The user thinks that she is running a Java program and may or may not be aware that there is Delphi code executing in a DLL somewhere.
Now, with the Invocation API, things are slightly different. Instead of executing java.exe at the command prompt, we will simply run a Delphi executable (let's just call it myprog.exe for now) that has the Java runtime embedded in it. Again, embedding here simply means that we load the Java runtime from the executable, instead of running it as a program typed at the command prompt. When we run myprog.exe, the OS loads the executable into memory and it starts executing. One of the first things it does (or it could do it later) is to load the Java Virtual Machine. Since the JVM is implemented in a DLL (jvm.dll), myprog.exe simply loads it as it would any other DLL it wished to link with at runtime. Our program would execute code similar to this:
Once this DLL is loaded into memory, myprog.exe can make calls into it just as it would with any other DLL and the interaction between Delphi code and Java code takes place just as we've seen in all of our previous examples.JVMHandle := LoadLibrary('jvm.dll');Note: The important point to understand in this scenario is that the Delphi program, myprog.exe, is what bootstrapped the whole process. The user thinks that she is running a Delphi application and may or may not be aware that there is Java code executing in a Java VM somewhere.
Of course, the code shown above implies that the Java VM, jvm.dll, is in the user's path somewhere. Also note that jvm.dll is the DLL that contains the Java VM for version 1.2 of the JDK. The VM for version 1.1 is located in javai.dll. We will see how to detect and use both versions later in this document.
The Invocation API portion of the Java Native Interface translation is still a work in progress. Although the translation is complete, the functionality of the wrapper class, TJavaVM is not. This doesn't mean that the wrapper class cannot be used, it simple means that it is not complete. There are several more "features" that I'd like to add that hide the underlying API a little better. I felt that it was more useful to release the translation in this state, rather than wait (what could be weeks or months or longer) until the other features were completed. Maybe that would be in a 1.1 (or 2.0) release of this translation. Also, as is the case with most software, until I receive and compile feedback, it's difficult to decide what features are missing. So, if you think something is missing, it's because it probably is.
As is the case with many of my Java experiences, setting up and configuring a compile-time and run-time environment seems to be the hardest part of Java programming. You may not have had frustrating experiences, but I have. Setting up a Java Runtime Environment, JRE, is not that difficult, though, once you know what to do. In fact, it's simply a matter of adding a couple of directories to your PATH environment variable. If you don't have a JRE, you can download one from Sun's website. For this tutorial, you can use the JAVA 2 RUNTIME ENVIRONMENT Standard Edition, which can be freely downloaded from Sun's website. If you installed the Java 2 SDK then you probably already have a JRE installed.Java 2 JRE
If you are working with the Java 2 JRE, there are 2 directories that need to be added to your PATH. The directories are \bin and \bin\classic, which will be in the directory where you installed the JRE. For example, if you installed the JRE into the directory C:\JRE1.2, then you would addC:\JRE1.2\bin;C:\JRE1.2\bin\classicto your PATH variable. The JRE (for Java 2) is implemented in the DLL named jvm.dll, which resides in \bin\classic. All of the supporting JRE DLLs reside in directories relative to this directory, so it's important that you DO NOT MOVE OR COPY THIS FILE to another location. If you do, you will encounter strange problems that will confuse you for hours (or days!)JDK 1.1 JRE
If you are working with the JDK 1.1.x runtime then there is only one directory that need to be added to your PATH. The directory is \bin, which will be in the directory where you installed the JRE. For example, if you installed the JRE into the directory C:\JRE1.1.6, then you would addNotesC:\JRE1.1.6\binto your PATH variable. The JRE (for JDK 1.1.x) is implemented in the DLL named javai.dll, which resides in \bin. All of the supporting JRE DLLs reside in directories relative to this directory, so it's important that you DO NOT MOVE OR COPY THIS FILE to another location. If you do, you will encounter strange problems that will confuse you for hours (or days!)During my testing of the Invocation API, I came across several "weird" situations. All of them were due to the fact that multiple versions of jvm.dll and javai.dll were installed on my computer while I was developing this code. Some of these DLLs failed to work correctly or even at all. I don't know why. I also don't know where they came from. I have installed many, many programs on my computers and certainly some of these programs felt is was necessary to install yet-another Java runtime on my machine. My advice to you is to make sure that you have only one copy of jvm.dll and javai.dll in your PATH.
Also, because the names of the DLLs are different between JDK 1.1.x and Java 2, you can easily have both installed and accessible simultaneously. This certainly makes it easy to test and use both versions of the JRE on the same machine (if you require this ability.)
Yeah, I know what you're saying, "No, not another Hello World! program..." By using the same example in all cases, it will make it easier for you to compare and contrast the different approaches. In the example from Part One, the words Hello World! were printed to the screen by the Delphi DLL. The DLL was loaded by a Java program, which essentially boot-strapped the whole process. Now, in this example, Java will print those words to the screen. The twist is that Java will be loaded by a Delphi program. The Delphi program is boot-strapping the process this time as described in the Overview above.This Hello World! example, as in the first Hello World! example is implemented as a console application. This was done to keep the code as simple as possible while introducing the Invocation API. A later example will be a complete Windows GUI application.
This is the Java code that will print the words Hello World from Java! to the screen:
This Java class resides in a file called HWJava.java and simply contains one public static function called printHello(). As you can see, this is a very trivial class which is why it is used in this example. The Delphi code is not going to be as trivial, though. At this point, it's important that you understand the mechanisms used by Delphi to access Java code at runtime without getting bogged down with the details of the Java code.public class HWJava { public static void printHello() { System.out.println("Hello World from Java!"); } }Here is the Delphi console application in a file called HelloWorld1.dpr:
You should open a command window (DOS prompt) in the directory where your Delphi and Java files are and execute the Delphi program:program HelloWorld1; {$APPTYPE CONSOLE} uses SysUtils, JNI; var Options: array [0..4] of JavaVMOption; VM_args: JavaVMInitArgs; JavaVM: TJavaVM; JNIEnv: TJNIEnv; Cls: JClass; Mid: JMethodID; Errcode: Integer; begin try // Create the JVM (using a wrapper class) JavaVM := TJavaVM.Create; // Set the options for the VM Options[0].optionString := '-Djava.class.path=.'; VM_args.version := JNI_VERSION_1_2; VM_args.options := @Options; VM_args.nOptions := 1; // Load the VM Errcode := JavaVM.LoadVM(VM_args); if Errcode < 0 then begin WriteLn(Format('Error loading JavaVM, error code = %d', [Errcode])); Exit; end; // Create a Java environment from the JVM's Env (another wrapper class) JNIEnv := TJNIEnv.Create(JavaVM.Env); // Find the class in the file system. This is why we added // the current directory to the Java classpath above. Cls := JNIEnv.FindClass('HWJava'); if Cls = nil then begin WriteLn('Can''t find class: HWJava'); Exit; end; // Find the static method 'printHello' within the HWJava class Mid := JNIEnv.GetStaticMethodID(Cls, 'printHello', '()V'); if Mid = nil then begin WriteLn('Can''t find method: printHello'); Exit; end; // Call the static method JNIEnv.CallStaticVoidMethod(Cls, Mid, []); except on E : Exception do WriteLn('Error: ' + E.Message); end; end.HelloWorld1 <--- Type this at the command prompt Hello world from Java! <--- this is displayed on the screen
In Part One, I explained the Hello World! example in great detail. I won't go into that much depth in this example, as I expect that you have already gone through the first example and understand the basic concepts that were presented. For this example, I will explain the portions that are new and pertain to the Invocation API.These are the basic steps required to execute a method of a Java class from a Delphi application using JNI.pas:
Let's look at each of these steps in detail:
- Create an instance of TJavaVM, the wrapper class around the Java Virtual Machine.
- Set the options that describe how to load the VM.
- Load the VM
- Create an instance of TJNIEnv, the wrapper class around the Java runtime environment.
- Find the Java class that implements the method you wish to invoke.
- Find the method within the Java class.
- Call the method
Create an instance of TJavaVM:
This is pretty straight-forward. JavaVM is declared as:// Create the JVM (using a wrapper class) JavaVM := TJavaVM.Create;so the code above calls the TJavaVM's constructor Create, which simple instantiates a TJavaVM object and sets JavaVM to refer to it. Note that at this point, no JVM has been loaded. The constructor simply creates the wrapper class. We must explicitly load the VM after setting options, as shown next.JavaVM: TJavaVM;Load the Java VM:The relevant variables are declared as:// Set the options for the VM Options[0].optionString := '-Djava.class.path=.'; VM_args.version := JNI_VERSION_1_2; VM_args.options := @Options; VM_args.nOptions := 1;and in JNI.pas, JavaVMOption and JavaVMInitArgs are defined as:options: array [0..4] of JavaVMOption; VM_args: JavaVMInitArgs;Essentially, the variable VM_args of type JavaVMInitArgs contains the information necessary to configure the Java VM. These options are passed to the method (within the TJavaVM class) that will actually load the Java VM. The members of the record represent:JavaVMOption = packed record optionString: PAnsiChar; extraInfo: Pointer; end; JavaVMInitArgs = packed record version: JInt; nOptions: JInt; options: PJavaVMOption; ignoreUnrecognized: JBoolean; end;A JavaVMOption is simply a string (actually a PAnsiChar) that contains an option that is passed to the JRE much like you would use on the command line. In the example above, we created a 5-element array of JavaVMOptions, although we only used one element. We could have been more precise in the allocation, but because we are explicitly telling the JavaVMInitArgs variable, VM_args, the number of options (VM_args.nOptions := 1), the size of the array is unimportant. In the example, only one option is specified:
- version - The version of the Java Runtime Environment (JRE) and can be either JNI_VERSION_1_1 ($00010001) or JNI_VERSION_1_2 ($00010002).
- nOptions - The number of JavaVMOptions in the options array. (See next member.)
- options - A pointer to an array of JavaVMOptions
- ignoreUnrecognized - Tells the JRE to ignore unknown options.
Options[0].optionString := '-Djava.class.path=.';which simply includes the current directory (denoted by the dot . ) in the JRE's search path for Java classes. We include v�4\current directory because that's where the Java class file, HWJava.class, is in relation to the Delphi program, HelloWorld1.exe. This is an important option, because without it, the JRE would not be able to find the Java class. (Shortly, we will see the Delphi code that actually causes Java to find, via a FindClass method, the Java class.) The -D option is a system property that has the syntax:-D(name)=(value)We will only use the option shown above to include the current directory in the JRE's search. Consult a reference on Java for other options and their meanings.Create an instance of TJNIEnv:Again, this is pretty straight-forward. It's also a good idea to check the return value when calling the TJavaVM.LoadVM method. JNI.pas defines the possible return values as such:// Load the VM Errcode := JavaVM.LoadVM(VM_args); if errcode < 0 then begin WriteLn(Format('Error loading JavaVM, error code = %d', [Errcode])); Exit; end;Upon successfully loading the VM, the Env property of the TJavaVM class is set. Env maps to the private field FEnv, which is declared as:JNI_OK = 0; // success JNI_ERR = -1; // unknown error JNI_EDETACHED = -2; // thread detached from the VM JNI_EVERSION = -3; // JNI version error JNI_ENOMEM = -4; // not enough memory JNI_EEXIST = -5; // VM already created JNI_EINVAL = -6; // invalid argumentsFEnv: PJNIEnv;which is a pointer to a JNIEnv that will be used in the next step.Find the Java class:The TJNIEnv class is a wrapper around the raw JNI API that we saw in Part Two of this series. By using the TJNIEnv class, we have a more Delphi-like interface to the API.// Create a Java environment from the JVM's Env (another wrapper class) JNIEnv := TJNIEnv.Create(JavaVM.Env);Find the Java method:If the Java class HWJava is found, the variable Cls will contain a valid value, otherwise it will contain nil. Cls is declared as:// Find the class in the file system. This is why we added // the current directory to the Java classpath above. Cls := JNIEnv.FindClass('HWJava'); if Cls = nil then begin WriteLn('Can''t find class: HWJava'); Exit; end;Cls: JClass;Call the Java method:If the Java method printHello is found, the variable Mid will contain a valid method ID, otherwise it will be nil. Mid is declared as:// Find the static method 'printHello' within the HWJava class Mid := JNIEnv.GetStaticMethodID(Cls, 'printHello', '()V'); if Mid = nil then begin WriteLn('Can''t find method: printHello'); Exit; end;Mid: JMethodID;Note that since the Java method HWJava.printHello is a static method, we use the GetStaticMethodID function, rather than the GetMethodID function. Refer to Concept #4 from Part Two of the tutorial for an example of the GetMethodID function. In the example, the GetStaticMethodID takes 3 parameters:
- Cls - The JClass that was retrieved previously by the TJNIEnv.FindClass method.
- 'printHello' - The name of the static method in the HWJava class. Remember: Java is case-sensitive.
- '()V' - The signature of the printHello method. Refer to signatures in Part Two for a refresher.
Well, that is pretty much how you call a Java method from a Delphi program. There are many variations on this, depending on the circumstances of the Java method. Also note that you would want to call Free the TJavaVM and TJNIEnv objects within this code, but that was left out to keep the code simple. I encourage you to try this on your own and prove to yourself that this works. Once you've got this simple example working, you can move on to more ambitious code.This is the actual call to the Java method. There are several points of interest with this code:// Call the static method JNIEnv.CallStaticVoidMethod(Cls, Mid, []);In a later example, we will see how to call methods in a Java object as well as pass parameters to the methods and return values from them.
- The TJNIEnv.CallStaticVoidMethod tells us a few things itself.
- The method we wish to call in the Java class is a static method or class method, as opposed to a method of a Java object. This is evident from the word Static in CallStaticVoidMethod.
- The method will not return a value. This is evident from the word Void in CallStaticVoidMethod.
- There are 3 parameters required when calling any of the CallStaticXXXMethod API functions. The types and meanings are:
- A JClass - This is the value we obtained from the TJNIEnv.FindClass API call. This identifies the class that contains the method we want to invoke. (Had we wanted to invoke a method of a Java object instead of a class, we would pass a value that identified the object instead of the class. This object identifier is much like the Self object in Delphi or the this pointer in Java.)
- A JMethodID - This is the method ID we obtained when we called TJNIEnv.GetStaticMethodID.
- An array of parameters - These are the parameters that will be passed to the Java method we are calling. In our example, there are no parameters, so we pass an empty array.
By default, JNI.pas implicitly loads jvm.dll, the implementation of the JRE in the Java 2 platform. However, it is possible to use a different version of the JRE. Before Java 2, the JRE was implemented in javai.dll, which was part of the JDK 1.1.x distribution. For the most part, you can interchange the two JREs. Some features were added to the Java 2 JRE, but we won't explore any of those in this tutorial.The new version is called HelloWord2.dpr and is shown below. I put comments next to the 2 new variable declarations, and also around a block of code which is different from the previous version. These differences are discussed after this code:
The first thing to notice is that there are two new variable declarations:program HelloWorld2; {$APPTYPE CONSOLE} uses SysUtils, JNI; var VM_args11: JDK1_1InitArgs; // this is different Classpath: string; // this is different JavaVM: TJavaVM; JNIEnv: TJNIEnv; Cls: JClass; Mid: JMethodID; Errcode: Integer; begin try // Create the JVM (using a wrapper class) JavaVM := TJavaVM.Create; // ********* this is different, start ***************** // Set the options for the VM Errcode := JNI_GetDefaultJavaVMInitArgs(@vm_args11); if Errcode < 0 then begin WriteLn(Format('JNI_GetDefaultJavaVMInitArgs failed, error code = %d', [Errcode])); Exit; end; // Add the current directory to the classpath Classpath := vm_args11.classpath + ';.'; vm_args11.classpath := PChar(Classpath); // Load the VM Errcode := JavaVM.LoadVM(vm_args11); // ********* this is different, end ***************** if Errcode < 0 then begin WriteLn(Format('Error loading JavaVM, error code = %d', [Errcode])); Exit; end; // Create a Java environment from the JVM's Env (another wrapper class) JNIEnv := TJNIEnv.Create(JavaVM.Env); // Find the class in the file system. This is why we added // the current directory to the Java classpath above. Cls := JNIEnv.FindClass('HWJava'); if Cls = nil then begin WriteLn('Can''t find class: HWJava'); Exit; end; // Find the static method 'printHello' within the HWJava class Mid := JNIEnv.GetStaticMethodID(Cls, 'printHello', '()V'); if Mid = nil then begin WriteLn('Can''t find method: printHello'); Exit; end; // Call the static method JNIEnv.CallStaticVoidMethod(Cls, Mid, []); except on E : Exception do WriteLn('Error: ' + E.Message); end; end.The original code used JavaVMInitArgs and JavaVMOptions. Early versions of the JRE require a variable of type JDK1_1InitArgs. The Classpath variable (a string) is simply a variable to hold a newly constructed classpath, which is required by the JDK 1.1.x.VM_args11: JDK1_1InitArgs; // this is different Classpath: string; // this is differentI've added numbers to the new block of code to explain some details.
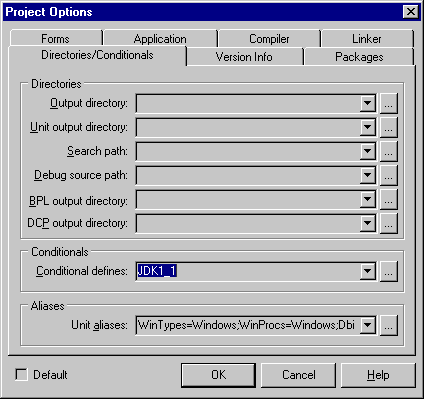
Details about the above code:// Set the options for the VM 1. Errcode := JNI_GetDefaultJavaVMInitArgs(@VM_args11); 2. if Errcode < 0 then 3. begin 4. WriteLn(Format('JNI_GetDefaultJavaVMInitArgs failed, error code = %d', [Errcode])); 5. Exit; 6. end; // Add the current directory to the classpath 7. Classpath := VM_args11.classpath + ';.'; 8. VM_args11.classpath := PChar(Classpath); // Load the VM 10. Errcode := JavaVM.LoadVM(VM_args11);There is one last thing that needs to be done. You must define the symbol JDK1_1 in the Project Options dialog.
- Line 1 - This API function retrieves the current default settings from the JRE. The only setting we are interested in at this time is the classpath value. This is because we need to add the current directory to it. With the JRE in the Java 2 platform, we didn't have to modify the classpath itself. We simply needed to add the current directory as an additional directory to be searched by the JRE.
- Line 7 - We simple extract the value of classpath from the VM_args11 record and add ;. to it, which is the notation for the current directory.
- Line 8 - We assign the new value of classpath back to the VM_args11 record. (Line 7 and 8 could have been done in one step, but I separated them to make it clear.)
- Line 10 - We load the VM passing a parameter of type JDK1_1InitArgs. The previous example passed a parameter of type JavaVMInitArgs. However, this is allowable because the TJavaVM.LoadVM method is overloaded to accept either type and the correct JNI API will be called internally.
This will cause the JDK 1.1-specific code in JNI.pas to become enabled. Because the compiler needs to know which version (hence, which DLL) to link into your program, this has to be done. If you look in JNI.pas, you will see this code:
Note that you must Build the project after defining a symbol in this dialog. If you just do a Compile, JNI.pas will not be recompiled and the portions that support version switching won't be enabled. You may have noticed that, so far, you haven't had to specify the names of these DLLs anywhere in your code. This is why (if you use the default static loading of the JRE) you must have javai.dll (for JDK 1.1) and/or jvm.dll (for Java 2) in your PATH. Later, we will see how to use a different DLL that's not in your PATH.{$IFDEF JDK1_1} JvmModuleName = 'javai.dll'; {$ELSE} JvmModuleName = 'jvm.dll'; {$ENDIF}Notes:
At this time, JNI.pas only supports two versions of the JRE, JDK 1.1 (1.1) and Java 2 (1.2). Sun has release a version 1.3 of the Java 2 platform which I haven't included yet. I suspect that it will not be difficult to add this capability. The source to JNI.pas is available to you, so if you need version 1.3 support now, you should have little problems adding it.A good way to understand what's in the value of classpath in the VM_args11 record is to print the value at runtime. For example, on my machine, when I print out this value using both versions, this is what it shows:
JDK 1.1.6 (The classpath is actually a single line. I broke it up so it would fit here.)
  n:\jre1.1.6\bin\..\classes;n:\jre1.1.6\bin\..\lib\classes.zip;
  n:\jre1.1.6\bin\..\lib\classes.jar;
  n:\jre1.1.6\bin\..\lib\rt.jar;
  n:\jre1.1.6\bin\..\lib\i18n.jar
Java 2 (The classpath is actually a single line. I broke it up so it would fit here.)N:\Borland\JBuilder35\jdk1.2.2\jre\lib\rt.jar; N:\Borland\JBuilder35\jdk1.2.2\jre\lib\i18n.jar; N:\Borland\JBuilder35\jdk1.2.2\jre\classesNote that this is before adding the current directory to the classpath. Also, the CLASSPATH environment variable has no affect on the JRE's classpath.
In the previous section, you saw how it was possible to use different versions of the JRE. Although each example used a different version of the JRE, the version you chose to use still had to be known at compile time. In other words, both of the previous examples required that the user have jvm.dll and/or javai.dll correctly installed on their computers. But what if you didn't want to "hard code" the version (or name of the DLL) into your code? In this case, you'd need to use another method called dynamic loading or explicit loading. (The term linking is also used in place of the term loading.)Technically, there are differences between dynamic/explicit loading and static/implicit loading. The default behavior of JNI.pas is to implicitly load the JRE. There are pros and cons to this method, and some of those are:
Explicit loading also has its pros and cons:
- The name of the DLL is hard-coded into your program. (Con)
- The DLL must be present and loaded into memory before your program runs. This can be undesirable if there are circumstances when your program won't access any of the code in the DLL. (Con)
- Programming is simpler because the programmer doesn't have to load/unload and DLLs are locate procedure names. (Pro)
As you can see, items that are pros in one method are cons in another, and vice-versa. There certainly are other considerations, but these are just a few of the common ones. By looking at these factors, one might conclude that explicit loading is a better way to go, since it has more pros than cons. However, if many DLL procedures will always be required in a DLL, explicitly locating them could outweigh the pros. However, in the case of JNI.pas, the wrapper class TJavaVM encapsulates the explicit loading/unloading so you, as the programmer, don't have to worry about it. This may give explicit loading another positive vote.
- The name of the is not hard-coded into the programmer and can change at runtime. (Pro)
- The DLL does not have to be loaded until it is actually going to be used. If the program never needs any code in the DLL, no time is wasted loading it. (Pro)
- Programming is more complicated because the programmer is now responsible for loading/unload the DLL and locating procedure names. (Con)
Using the Hello World! example from above, we will see how to modify it to use dynamic loading, instead of static (implicit) loading. The change is trivial. In fact, only two changes are required: one line of code is modified and a symbol is defined in the Project Options dialog. For brevity, I'm only going to show the line of code that differs between dynamic and static loading. Recall this line of code from the original program, HelloWorld1.dpr:
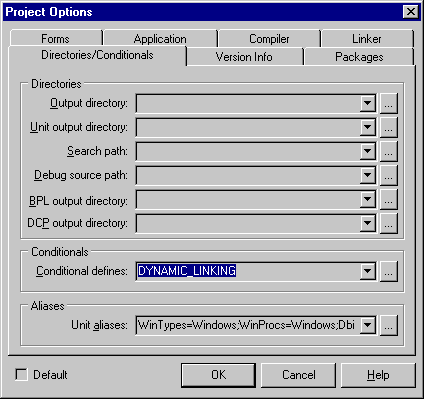
To modify this to work with the dynamic loading mechanisms, the line should be changed to this:// Create the JVM (using a wrapper class) JavaVM := TJavaVM.Create;If you think about it, this makes sense. Since we are not using static loading (implicit linking), we must specify the necessary information. This information is the version of the JRE we are loading (JNI_VERSION_1_2) and the name of the DLL that implements the JRE (jvm.dll). Also, we must define the symbol DYNAMIC_LINKING in the Project Options dialog:// Create the JVM (using a wrapper class) JavaVM := TJavaVM.Create(JNI_VERSION_1_2, 'jvm.dll');
Note that you must Build the project after defining a symbol in this dialog. If you just do a Compile, JNI.pas will not be recompiled and the portions that support the dynamic mechanisms won't be enabled. That's all there is to it. Because JNI.pas does all of the work of loading/unloading the DLL and locating the necessary procedures (using the Win API function GetProcAddress), the amount of extra work required to use this method is trivial.
Notes:
It is possible to use a JRE that isn't in your PATH. To do this, you must specify the path to the JRE as in this code:or, to use a JDK 1.1 version of the JRE:// Create the JVM (using a wrapper class) JavaVM := TJavaVM.Create(JNI_VERSION_1_2, 'C:\jdk1.2.2\jre\bin\classic\jvm.dll');Note that this DLL must be in the proper directory relative to other JRE support files. Refer to Configuring Your Machine above for details on installing a JRE.// Create the JVM (using a wrapper class) JavaVM := TJavaVM.Create(JNI_VERSION_1_1, 'C:\jre1.1.6\bin\javai.dll');
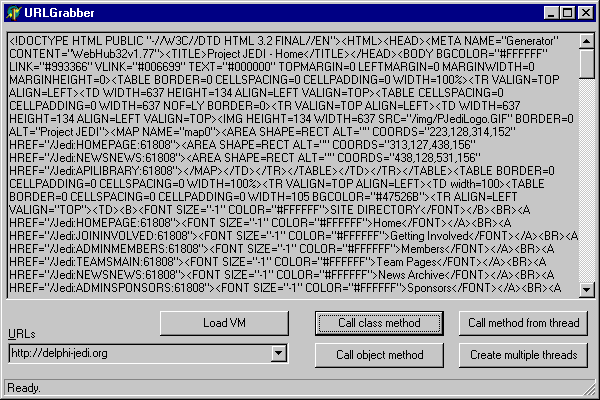
All of the previous examples have focused on using Delphi console applications to demonstrate accessing the Java Native Interface. This was primarily done to keep the code as simple as possible. (Although it is arguable that the code necessary to implement simple GUI applications in Delphi is equally simple.) In the example that follows, a more realistic Delphi application will be developed that will show you how to integrate Java code into your Delphi program. This example is by far the most complex in this tutorial. However, if you've followed the tutorial up to this point, it won't seem like that big of a step. All of the previous examples have worked towards bringing you to this point. You will actually only learn one new concept in this example: How to use the Java Native Interface with Delphi threads. We will see this technique later in the example.For this example, we will develop a Delphi application that is a complete, stand-alone, GUI application. The application is called URLGrabber and it's purpose is to download HTML pages from the Internet to your computer, not unlike how a web browser would do it. Through the UI, the user of the program must specify the URL of the web page to download (e.g. http://www.delphi-jedi.org/index.html)
The twist this time (there is always a twist <g>) is that the actually retrieving of the HTML document will be done by Java code. The name of the Java object is PageGrabber and it is implemented in a file named PageGrabber.java. The Delphi application will create this Java object and call a method, Fetch, which requires a single parameter of type string. This parameter is (you guessed it) the URL of the HTML document to download. After the Java object completes the task of retrieving the HTML document, it returns this document to the Delphi application where it will be displayed in a TMemo component on the form.
Download the files for this project.
The fundamental difference between them is that the first one, FetchS is a static (class) method, which simply calls the non-static method, Fetch. This was done so that you can see the different coding that is required in Delphi to access these methods. You can consider these two methods as the public interface of the PageGrabber class. However, the actual work is done by the private GetHTML method: (I've omitted everything except the non-essential parts)public static String FetchS(String inputURL) { PageGrabber pg = new PageGrabber(); return pg.Fetch(inputURL); } public String Fetch(String inputURL) { return GetHTML(inputURL); }
The full listing is in PageGrabber.java. There are a couple of points to be made here:private String GetHTML(String inputURL) { String html = ""; String thisLine = ""; URL url; try { url = new URL(inputURL); try { BufferedReader theData = new BufferedReader(new InputStreamReader(url.openStream())); try { while ((thisLine = theData.readLine()) != null) { html = html + thisLine; } // *** Omitted exception handlers *** } } } }
This will display the contents of the URL (www.yahoo.com) on the screen.java PageGrabber http://www.yahoo.com
The main form contains eight primary UI elements:
The code is to create the objects and load the VM is in the OnClick handler for the TButton btnLoadVM and is pretty much self-explanatory:FJavaVM: TJavaVM; FJNIEnv: TJNIEnv;
procedure TURLGrabberForm.btnLoadVMClick(Sender: TObject);
var
  Errcode: Integer;
  VM_args11: JDK1_1InitArgs;
  VM_args: JavaVMInitArgs;
  Classpath: string;
  Options: array [0..10] of JavaVMOption;
begin
  UpdateStatusBar('Loading VM...', True);

  try
      // Create the wrapper for the VM
    FJavaVM := TJavaVM.Create;

      // Get default settings (so we can display them)
    Errcode := JNI_GetDefaultJavaVMInitArgs(@VM_args11);
    if Errcode < 0 then
    begin
      ShowMessageFmt('JNI_GetDefaultJavaVMInitArgs failed, error code = %d', [Errcode]);
      Exit;
    end;

      // Display the classpath (this is just for reference)
    Classpath := VM_args11.classpath;
    mmoHTML.Lines.Add('CLASSPATH=' + Classpath);

      // Set up the options for the VM
    FillChar(Options, SizeOf(Options), #0);
    Options[0].optionString := '-Djava.class.path=.';
    VM_args.version := JNI_VERSION_1_2;
    VM_args.options := @Options;
    VM_args.nOptions := 1;

      // Load the VM
    Errcode := FJavaVM.LoadVM(VM_args);
    if Errcode < 0 then
    begin
        // Loading the VM more than once will cause this error
      if Errcode = JNI_EEXIST then
        MessageDlg('Java VM has already been loaded. Only one VM can be loaded.', mtError, [mbOK], 0)
      else
        ShowMessageFmt('Error creating JavaVM, code = %d', [Errcode]);
      Exit;
    end;

      // Create the Env class
    FJNIEnv := TJNIEnv.Create(FJavaVM.Env);

      // Enable UI buttons
    btnCallClassMethod.Enabled := True;
    btnCallObjectMethod.Enabled := True;
    btnCallMethodFromThread.Enabled := True;
    btnCreateMultipleThreads.Enabled := True;

  except
    on E: Exception do
    begin
      ShowMessage('Error: ' + E.Message);
      UpdateStatusBar('Load VM failed.');
      Exit;
    end;
  end;

  UpdateStatusBar('Ready.');
end;
procedure TURLGrabberForm.btnCallClassMethodClick(Sender: TObject);
var
  Cls: JClass;
  Mid: JMethodID;
  HTML: string;
  URL: string;
  JStr: JString;
begin
  UpdateStatusBar('Calling class method...', True);

  try
      // Get the URL from the UI
    URL := lstURLs.Text;

      // Find PageGrabber class
    Cls := FJNIEnv.FindClass('PageGrabber');
    if Cls = nil then
    begin
      ShowMessage('Can''t find class: PageGrabber');
      Exit;
    end;

      // Locate static method 'FetchS' in class
    Mid := FJNIEnv.GetStaticMethodID(Cls, 'FetchS', '(Ljava/lang/String;)Ljava/lang/String;');
    if Mid = nil then
    begin
      ShowMessage('Can''t find method: FetchS');
      Exit;
    end;

      // Call the static method
    JStr := FJNIEnv.CallStaticObjectMethod(Cls, Mid, [URL]);

      // Convert the returned JString to a Delphi string
    HTML := FJNIEnv.JStringToString(JStr);

      // Display the HTML
    mmoHTML.Lines.Add(HTML);

  except
    on E: Exception do
      ShowMessage('Error: ' + E.Message);
  end;

  UpdateStatusBar('Ready.');
end;
There are two inputs and two outputs for this function. The inputs are the Java environment, JNIEnv: TJNIEnv, and the class name, Classname: string. The function returns two pieces of information to the caller. The first value it returns (via the Result variable) is the newly created Java object. The second value is a JClass value, which is returned through the JClass var parameter. This value is required by the calling function.function CreateJavaObject(const JNIEnv: TJNIEnv; const ClassName: string; var AClass: JClass): JObject; var Mid: JMethodID; begin Result := nil; // Find the class try AClass := JNIEnv.FindClass(PChar(ClassName)); if AClass = nil then Exit; // Get its default constructor Mid := JNIEnv.GetMethodID(AClass, '<init>', '()V'); if Mid = nil then exit; // Create the object Result := JNIEnv.NewObjectA(AClass, Mid, nil); except on E: Exception do ShowMessage('Error: ' + E.Message); end; end;
Note that this isn't a general-purpose object creation function because the signature of the constructor ('()V') is hard-coded into the function. This function just gives you an idea of some of the utility functions that you may want to write to handle very common cases in your coding. This function is used by the OnClick handler for the TButton btnCallObjectMethod. This code shows the Java class being located, the object being constructed (via the CreateJavaObject function), the Fetch method being located and called.
procedure TURLGrabberForm.btnCallObjectMethodClick(Sender: TObject);
var
  Cls: JClass;
  Mid: JMethodID;
  PageGrabber: JObject;
  JStr: JString;
  URL, HTML: string;
begin
  UpdateStatusBar('Calling object method...', True);

  try
      // Get the URL from the UI
    URL := lstURLs.Text;

      // Construct PageGrabber object
    PageGrabber := CreateJavaObject(FJNIEnv, 'PageGrabber', Cls);
    if PageGrabber = nil then
    begin
      ShowMessage('Can''t create PageGrabber object');
      Exit;
    end;

      // Locate the 'Fetch' method
    Mid := FJNIEnv.GetMethodID(Cls, 'Fetch', '(Ljava/lang/String;)Ljava/lang/String;');
    if Mid = nil then
    begin
      ShowMessage('Can''t find method: Fetch');
      Exit;
    end;

      // Call the method
    JStr := FJNIEnv.CallObjectMethod(PageGrabber, Mid, [URL]);

      // Convert the returned JString to a Delphi string
    HTML := FJNIEnv.JStringToString(JStr);

      // Display the HTML
    mmoHTML.Lines.Add(HTML);

  except
    on E: Exception do
      ShowMessage('Error: ' + E.Message);
  end;

  UpdateStatusBar('Ready.');
end;
There are some guidelines to follow if native (Delphi) code is to access the JNI from multiple threads. I am not going to go into a lot of detail about it because that is a larger topic that is beyond the scope of this tutorial. However, the place to go for detailed answers is Sheng Liang's The Java Native Interface - Programmer's Guide and Specification. I highly recommend this book to anyone interested in doing any serious JNI programming. A link to this book is in the resources section.
One of the points that is stressed when accessing the JNI from native threads is that you must not pass the JNIEnv pointer from one thread to another. The JNIEnv pointer is only valid in the thread that created it (or obtained it), so you can't save it or cache it for use in more than one thread. If you remember from the btnLoadVM event handler for the OnClick event, you will recall that we stored this pointer in a field of the TFrmMain class called FJNIEnv.
Now, you may be asking yourself, "If you can't store this value, why did we do that?". The reason is because we didn't use it in more than one thread. The UI for the application itself is running in a single thread, the main thread, and so any code that is executing in the main thread can use this stored value. The problem arises when you create other threads (worker threads) that need to access this JNIEnv pointer. And that is exactly what we are going to do now.
Important Linux Note:
The first thing we need to do is to derive a new class that is based on the TThread class. This class is shown here:
As you can see, it is fairly simple. There are two points here that are relevant to the discussion of threads.TURLThread = class(TThread) public URL: string; HTML: string; JavaVM: TJavaVM; constructor Create(const JavaVM: TJavaVM; const URL: string); procedure Execute; override; procedure UpdateUI; end;
These two additional lines of code are describe below. Each function is part of the JavaVM record in the Invocation API. The TJavaVM class contains a member (a property) of type PJavaVM (a pointer to a JavaVM.) Through this property, we can access the functions necessary to support accessing the Java Native Interface from Delphi threads.procedure TURLThread.Execute; var Cls: JClass; Mid: JMethodID; PageGrabber: JObject; RetVal: JString; Env: PJNIEnv; JNIEnv: TJNIEnv; begin try // *** Attach this thread to the running JVM JavaVM.JavaVM^.AttachCurrentThread(JavaVM.JavaVM, @env, nil); // Create the TJNIEnv wrapper class from the environment just retrieved JNIEnv := TJNIEnv.Create(env); // Create an instance of the PageGrabber Java object PageGrabber := CreateJavaObject(JNIEnv, 'PageGrabber', Cls); // Locate the method we wish to call Mid := JNIEnv.GetMethodID(Cls, 'Fetch', '(Ljava/lang/String;)Ljava/lang/String;'); if Mid = nil then begin ShowMessage('Can''t find method: Fetch'); Exit; end; // Call the method RetVal := JNIEnv.CallObjectMethod(PageGrabber, Mid, [URL]); // Convert the JString to a Delphi string HTML := JNIEnv.JStringToString(RetVal); // This will display the HTML in a "safe" manner Synchronize(UpdateUI); // *** Release the reference to this thread (important!) JavaVM.JavaVM^.DetachCurrentThread(JavaVM.JavaVM); except on e : Exception do ShowMessage('Error: ' + e.Message); end; end;
procedure TURLGrabberForm.btnCallMethodFromThreadClick(Sender: TObject);
var
  URLThread: TURLThread;
  URL: string;
begin
  mmoHTML.Clear;
  Application.ProcessMessages;
  URL := lstURLs.Text;
  URLThread := TURLThread.Create(FJavaVM, URL);
  URLThread.Resume;
end;
procedure TURLGrabberForm.btnCreateMultipleThreadsClick(Sender: TObject);
var
  URLThread: TURLThread;
  I: Integer;
  URL: string;
begin
  UpdateStatusBar('Creating threads...', True);

    // Create a thread for each URL in the list
  for I := 0 to lstURLs.Items.Count - 1 do
  begin
    URL := lstURLs.Items[I];
    URLThread := TURLThread.Create(FJavaVM, URL);
    URLThread.Resume;
  end;

  UpdateStatusBar('Ready.');
end;
Part Three of Using the Java Native Interface with Delphi focused on the Invocation API, which is part of the more general Java Native Interface API. The primary purpose of the Invocation API is to provide a mechanism for native applications (in our case Delphi applications) to access Java code. This is also known as "embedding" the Java Virtual Machine into a native application. Since the Java VM is implemented in a DLL, it is a trivial matter for Delphi to load this DLL at runtime and access its exported functions.This tutorial is meant as an introduction to the Invocation API, not an exhaustive reference document. After going through this tutorial, you should have a pretty good understanding of what the Invocation API is and how to use it. For further information on the Invocation API or any other issues with the JNI, refer to one of the links listed in the resources section.
So.... what's next? Well, this was pretty much all that I had intended to show with my Using the Java Native Interface with Delphi. There are certainly more topics that could be discussed, but the main goal was to get you up to speed with this technology. I have mentioned Sheng Liang's book in the resources section of this tutorial. This is a must have for anyone wishing to further their understanding of the Java Native Interface. And, although it is targeted at C/C++ programmers, many (if not all) of the topics discussed in the book apply to Delphi as well. I just wish I would have discovered this book sooner.
Download the files used in this document.
Using the Java Native Interface with Delphi (Part One)
Using the Java Native Interface with Delphi (Part Two)
Helpful resources (from Part One.)